
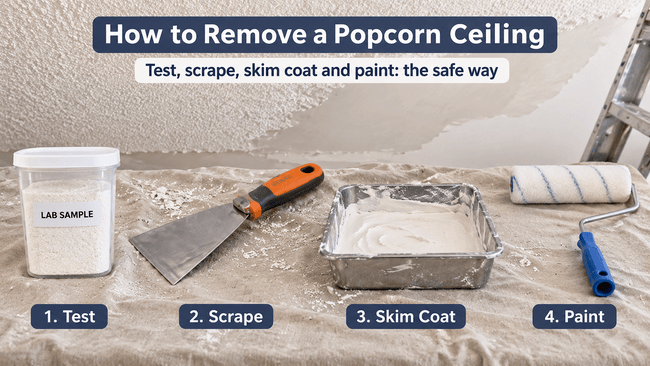
Quick answer: To remove a popcorn ceiling, test for asbestos first, especially in homes built before the mid-1980s. If the test is clear, wet the texture, scrape it, skim coat, sand, prime and paint. If it tests positive, don’t scrape it. Hire a licensed asbestos abatement professional, or cover the ceiling instead.
Safety first: This guide is general information and is not a substitute for a lab test or professional advice. Asbestos rules differ by state and city. Do not scrape, sand or drill a popcorn ceiling until you know what is in it.
Popcorn ceilings had their moment, and now most people want them gone. They collect dust, they’re hard to clean, and they make a room look dated. Removing one is a very doable project, but it has a step that most projects don’t: finding out what’s in the ceiling before you touch it.
This guide shows how to remove a popcorn ceiling in the right order: test, choose your method, scrape, finish, and paint. It also covers painted ceilings, covering instead of removing, and what it all costs.
Does your popcorn ceiling contain asbestos? (How to test and when)
Popcorn texture was sprayed onto ceilings from the 1950s through the 1980s, and some of it contained asbestos. You can’t tell by looking at it. The only way to know is a lab test.
When to test:
| When the ceiling was installed | What to do |
| Before 1980 | Assume it may contain asbestos. Test before any work. |
| 1980 to about 1990 | Possible, because old stock stayed in use. Test before any work. |
| After about 1990 |
Much less likely, but test if you’re unsure when the texture went on.
|
What counts is the age of the ceiling texture, not only the age of the house. If an older home was re-textured later, the newer texture may be different.
Asbestos is a risk when fibers get into the air. A ceiling in good condition that nobody disturbs is not an emergency. The danger comes from scraping, sanding or drilling it.
How to test:
- Hire an accredited inspector (the EPA’s recommendation). They collect the sample with proper protection and send it to a lab. Costs vary, often roughly $150 to $400 or more per sample.
- Use a mail-in lab kit (a cheaper option). Kits typically cost roughly $40 to $80 per sample plus shipping. If you take the sample yourself, follow the kit’s instructions exactly: wet the spot first, wear a respirator, never scrape dry, and seal the sample. The EPA advises against casual sampling because taking the sample can release fibers, and rules vary by state.
Results usually come back within a few days to a couple of weeks.
What the result means:
- Not detected: you can go ahead with removal using the steps below.
- Asbestos found: don’t scrape, sand or disturb the ceiling. In most states, removal of confirmed asbestos must be done by a licensed abatement contractor, though a few states have different rules for owners of their own single-family homes. Check with your state environmental agency. Covering the ceiling (see below) is often a lower-cost option.
For more, see the EPA’s asbestos information in the sources at the end of this post. A test result applies only to the sample taken, so test each room that might have been textured at a different time.
Your options: scrape, skim coat over it, or cover with drywall
| Method | Best for | Difficulty | Mess | Cost | Asbestos? |
| Scrape, then skim coat | A smooth ceiling | Medium to hard | Very high | Lowest (DIY) | Only if the test is clear |
| Skim coat over the texture | Light textures only | Medium | Medium | Low | Heavy popcorn is too thick for this |
| Cover with new drywall | Asbestos, or you want zero scraping | Medium to hard | Low | Moderate | Does not disturb the texture |
A few notes on this table:
- Skim coat over it works for light textures like a fine stipple. Popcorn is too bumpy and thick for a skim coat to hide it, so true popcorn usually has to be scraped first.
- Cover with drywall keeps the popcorn in place, so it’s the safest way to deal with a positive test, and it’s far cleaner than scraping.
Tools and safety gear
For scraping
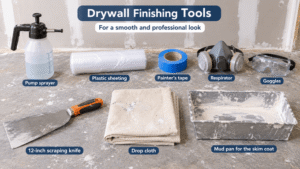
- A garden pump sprayer (for water)
- A wide drywall knife (6 to 12 inches) or a ceiling scraper with a bag attachment
- Plastic sheeting (6 mil) and painter’s tape to cover floors, walls and fixtures
- Drop cloths, a ladder and a work light or headlamp
- A stepladder you can reach with comfortably, or a scaffold for big rooms
Safety gear
- A respirator (N95 at minimum; a P100 is better), safety goggles, a hat and gloves
- Disposable coveralls
- A shop vacuum with a HEPA filter
For finishing
- A 12-inch drywall knife and a mud pan
- Joint compound (see joint compound types)
- A pole sander and sanding sponges
- Drywall primer, paint and a roller
How to scrape a popcorn ceiling, step by step
Only do this once your test is clear.
- Empty and protect the room. Take out the furniture. Cover the floor with plastic sheeting and tape it to the baseboards. Cover the walls and any fixtures. Turn off the power to the room and cover the lights and vents.
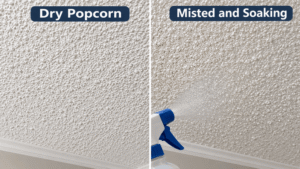
- Wet a small section. Fill the pump sprayer with plain water and mist an area of about 4 x 4 feet. Don’t soak it. You want the texture damp, not dripping.
- Wait about 15 minutes. The water soaks in and softens the texture.
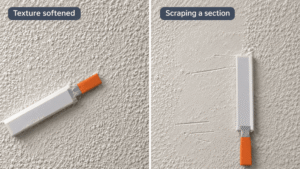
- Scrape gently. Hold the knife at a low angle and push it along the surface. The texture should come off in wet clumps. Keep the blade flat so you don’t gouge the drywall.
- Work in sections. Re-wet stubborn spots and scrape again. Don’t let the ceiling dry out and then scrape dry, because that creates dust.
- Collect the debris. Scoop up the wet material with the plastic and bag it. Follow your local rules for disposal.
- Let the ceiling dry. Give it a day. Then check for any texture left behind and for gouges.
- Clean up the dust. See how to clean off drywall dust.
Expect about 4 to 8 hours of scraping for a typical room. It’s messy, tiring work, so take breaks and keep your respirator on.
What if the popcorn is painted?
Painted popcorn ceilings are harder because the paint seals the surface and water can’t soak in.
Test it first. Spray a small area and wait a few minutes. If the water beads up and runs off, the texture is painted.
Your options:
- Spray more and wait longer. Sometimes repeated misting over several minutes eventually gets through.
- Score the surface lightly. Gently scratch the paint skin with a scraper so water can reach the texture. Take care not to cut into the drywall.
- Scrape dry. It works but makes a lot of dust, so use plastic containment, a respirator and a HEPA vacuum. Only do this if the test is clear.
- Cover the ceiling instead. If the texture is thickly painted, covering with drywall may be easier and cleaner than fighting it.
Test for asbestos first on painted ceilings too. Paint doesn’t tell you what’s underneath.
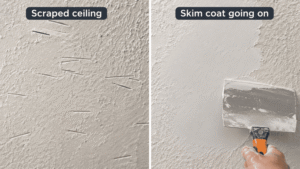
How to skim coat after scraping
A scraped ceiling is rough and may have gouges. A skim coat fills and smooths it.
- Patch deep gouges and holes first. See how to patch a hole in drywall and how to repair loose tape on a textured ceiling.
- Prime the ceiling. A coat of primer helps the compound grip and stops the paper from soaking up moisture.
- Apply a thin coat of thinned joint compound. Use a 12-inch knife and long, even strokes. Thin it according to the label so it spreads easily.
- Let it dry fully, then scrape off ridges.
- Apply a second coat in the opposite direction to the first. Many ceilings need two or three thin coats. See how many coats of drywall mud.
- Sand lightly with 120 to 150 grit. See the sandpaper guide for removing drywall texture and the ceiling sanding guide. Wear a mask and goggles.
- Clean the dust, prime and paint. See whether you need to prime and how to prepare drywall for paint. A flat paint hides small flaws best. See what paint color hides drywall imperfections.
For the full technique, read our complete skim coat guide. If something goes wrong, see how to fix a bad mud job.
Want texture instead of a flat ceiling? You can re-texture it. See how to texture with drywall mud and how to prepare drywall for knockdown texture.
How to cover a popcorn ceiling instead of removing it
Covering leaves the texture undisturbed, which makes it the safest choice if the test finds asbestos. It’s also much less messy.
- Find the joists. Mark their location with a pencil or chalk line.
- Choose your board. Thin drywall (1/4 or 3/8 inch) is common for covering. See what drywall to use on a ceiling.
- Cut and lift the sheets. A drywall lift helps a lot. For cutting tips, see how to cut drywall without making dust.
- Fasten into the joists with longer screws, because they have to go through the new board and the old texture.
- Tape, mud, sand, prime and paint as for any new ceiling. The full process is in our guide to drywalling a room.
Remember to:
- Extend electrical boxes and light fixtures so they sit flush with the new surface.
- Check how any recessed lights and smoke detectors need to be reinstalled.
- Ask a professional first if the ceiling has asbestos and you plan to drill or screw through it. Fastening through asbestos-containing texture can disturb it, so some pros use other methods.
Popcorn ceiling removal cost (DIY, pro and asbestos abatement)
Costs vary a lot by region, ceiling height and finish level, and sources disagree, so treat these as rough ranges.
| Item | Typical cost |
| Asbestos test | Lab mail-in kit: roughly $40 to $80 per sample. Accredited inspector: roughly $150 to $400 or more per sample. |
| DIY scrape, skim coat and paint | Roughly $50 to $150 per room in materials, plus 4 to 8 hours of scraping and a few days of finishing. |
| Professional scrape and finish (no asbestos) | Roughly $1 to $4 per square foot. Thumbtack lists a typical project at about $1,600 to $4,800. HomeAdvisor lists about $930 to $3,075. |
| Cover with drywall | Often roughly $2 to $6 per square foot. |
| Asbestos abatement (licensed) | Roughly $3 to $8 per square foot, sometimes more. Small rooms often hit a minimum charge. Finishing is extra. |
Example: a 12 x 14 foot bedroom (168 square feet)
- Pro scrape and finish: roughly $170 to $670 at $1 to $4 per square foot, though many companies have minimum charges that push small jobs higher.
- Abatement: roughly $500 to $1,350 at $3 to $8 per square foot, plus the cost of skim coating, priming and painting afterward.
Ways to save: get at least three quotes, ask what the quote includes (finishing and paint are often separate), and bundle several rooms into one job. Always get the asbestos test before you accept a quote.
Can you paint over popcorn instead?
Yes. Painting is the cheapest way to freshen a popcorn ceiling and is often done with an airless sprayer, though a thick-nap roller can work too.
Pros:
- Cheap and quick
- No scraping, no mess
- It also helps seal and brighten the ceiling
Cons:
- The texture stays, and it still collects dust.
- Paint adds weight and can make future scraping harder, because painted texture doesn’t soak up water.
- Rolling can pull texture loose, so spraying is often better.
If your ceiling has asbestos and is in good condition, painting or sealing it may be an option, but ask a qualified professional first. Rolling or sanding could disturb it. Never scrape or sand it yourself.
FAQs
Does my popcorn ceiling have asbestos?
You can’t tell by looking. Popcorn ceilings from before the mid-1980s may contain asbestos, and some from later years do too because old stock stayed in use. Only a lab test can confirm it.
How much does it cost to remove a popcorn ceiling?
Professional removal and finishing usually runs roughly $1 to $4 per square foot. DIY costs about $50 to $150 per room in materials. If the ceiling has asbestos, licensed abatement typically adds roughly $3 to $8 per square foot.
Can I remove a popcorn ceiling myself?
Yes, if the ceiling tests clear for asbestos. It’s messy and tiring, but doable with the right gear. If it tests positive, don’t scrape it. In most states, removal of confirmed asbestos must be done by a licensed professional.
How do you remove a painted popcorn ceiling?
Painted texture is harder because water can’t soak in. Try spraying more and waiting longer, lightly scoring the paint, or scraping dry with full dust control and a clear asbestos test. Covering the ceiling with drywall may be easier.
Is it better to remove or cover a popcorn ceiling?
Covering is less messy and is the safest option when asbestos is present, since the texture isn’t disturbed. Removal gives you a flat ceiling without adding thickness, and it’s often cheaper when the ceiling is asbestos-free.
How long does it take to remove a popcorn ceiling?
Scraping a typical room takes about 4 to 8 hours. With skim coating, drying time, sanding and paint, plan on three to four days for the whole room.
Quick recap
- Test first. Don’t scrape, sand or drill a popcorn ceiling until you know what’s in it.
- If the test is clear: wet, wait, scrape, skim coat, sand, prime and paint.
- If it tests positive: hire a licensed abatement pro, or cover the ceiling.
- Painted popcorn is harder. Test a small area with water first.
- Costs vary widely, so get several quotes and check what’s included.
Got a popcorn ceiling question? Leave a comment with your home’s age, whether the ceiling is painted, and what you’re stuck on, and I’ll point you in the right direction.