
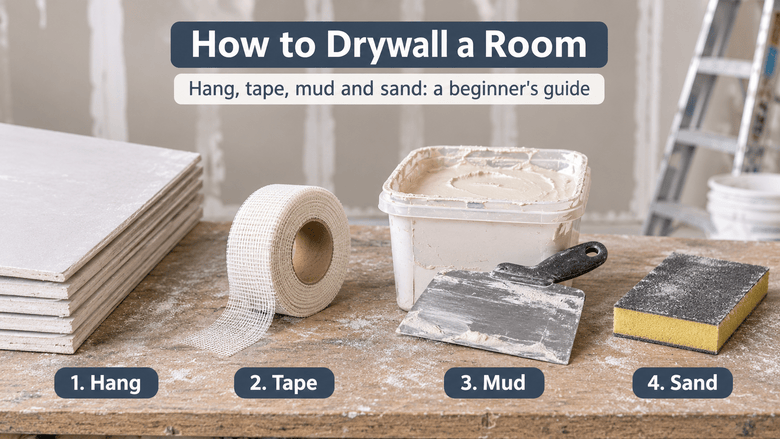
Quick answer: To drywall a room, measure and order your sheets, hang the ceiling first and then the walls, install corner bead, tape every joint, and apply three thin coats of joint compound with drying time between them. Then sand lightly, clean up the dust and prime. Expect 3 to 5 days for a typical room, mostly because of drying time.
Drywalling looks like a job only pros can do. It isn’t. The tools are simple and the steps are the same on every room. What takes practice is the finishing, and the good news is that mistakes are very fixable, because the mud sands off.
This guide walks you through how to drywall a room from start to finish, in the order you’ll actually do it. Each step links to a deeper guide when you need more detail.
Before you start: tools, materials, and a realistic timeline
Tools for hanging
- Tape measure and a drywall T-square (see how to use a drywall T-square)
- Utility knife and a drywall saw (see how to use a drywall saw)
- Screw gun or drill with a drywall bit or dimpler
- A stud finder, pencil and chalk line
- A ladder, and a rented drywall lift if you’re doing a ceiling
- Safety glasses, gloves and an N95 mask
Tools for finishing
- 6, 10 and 12-inch drywall knives
- A mud pan or hawk
- A mixing paddle and a 5-gallon bucket
- A pole sander and sanding sponges (see our sandpaper grit guide)
- A shop vacuum and good work lights
Materials
- Drywall sheets
- 1-1/4 inch coarse-thread screws for 1/2 inch drywall (see what size screws to use)
- Paper or mesh joint tape
- Joint compound (see joint compound types)
- Corner bead for outside corners
- Drywall primer
A realistic timeline for one room
| Day | What you do |
| Day 1 | Measure, hang ceiling and walls, install corner bead |
| Day 1 to 2 | Tape the joints and apply the first coat |
| Day 2 to 3 | Second coat, once the first is dry |
| Day 3 to 4 | Third (final) coat |
| Day 4 to 5 | Sand, clean up dust, prime |
Mud takes the time, not your hands. Each coat needs to dry before the next, often up to a day for a drying-type compound. A setting-type compound can shorten the schedule. For more detail, see how many days it takes to drywall and how to dry drywall mud faster.
Step 1: Measure and calculate how many sheets you need
Measure each wall’s length and the ceiling’s length and width. Walls plus ceiling gives you the total area, and you subtract doors and windows (a typical door is about 20 square feet, a window about 15).
Example: a 12 x 12 foot room with 8-foot ceilings
- Walls: 48 feet around x 8 feet high = 384 square feet
- Ceiling: 12 x 12 = 144 square feet
- Total: 528 square feet, minus about 36 for a door and window, so roughly 492
- A 4 x 8 sheet is 32 square feet, so that’s about 15.5 sheets
- Add about 10 percent for waste, and plan on 17 to 19 sheets
Our drywall calculator does the sums for you, and our guide on how to measure drywall shows how to avoid measuring mistakes.
Pick the right thickness:
- 1/2 inch: the standard for most walls and for ceilings with framing 16 inches apart.
- 5/8 inch: a good choice for ceilings, wider framing and fire-rated assemblies. See what drywall to use on a ceiling and where fire-code drywall is needed.
- Moisture-resistant board: for bathrooms and other damp spots. See where to use mold-resistant drywall.
A 4 x 8 sheet of 1/2 inch drywall weighs roughly 55 pounds, so plan on a helper.
Step 2: Hang the ceiling
Always hang the ceiling first. The wall sheets then support the edges of the ceiling sheets and help prevent cracks where the two meet.
- Mark the joists. Use a stud finder and a pencil or chalk line so you know exactly where to drive screws.
- Lift the first sheet. Use a drywall lift if you can, or a helper and a couple of T-braces. Press the sheet tight against the joists.
- Fasten it. On a ceiling, drive screws about every 12 inches along each joist, and closer together along the edges if your local code requires it. Keep each screw about 3/8 inch from the edge. For the full pattern, see our drywall screw spacing guide.
- Dimple, don’t tear. Set each screw head just below the surface, without breaking the paper.
- Stagger the seams. Offset the ends of the sheets so joints don’t line up in a row.
Don’t force a sheet into place. A sheet that’s cut a little loose fits better than one that’s too tight.
Step 3: Hang the walls (screw spacing and edges on studs)
For most rooms, hang wall sheets horizontally. It makes fewer seams and puts the tapered factory edges where they’re easiest to finish. For tall walls, see how to hang drywall on 10-foot walls.
- Start at the top. Lift the top sheet tight to the ceiling so it supports the ceiling edge.
- Add the bottom sheet. Leave a small gap (about 1/4 to 1/2 inch) above the floor. The baseboard will hide it.
- Fasten into the studs. On walls, screws go about every 16 inches in the field, and many builders use about 8 inches along the edges. Keep screws 3/8 inch from the edge.
- Land the edges on studs. Sheet edges and ends should be fastened to framing. See whether drywall edges need to be on studs.
- Stagger the end joints. Keep end joints (butt joints) away from the center of the wall and from each other.
Good to know:
- Using metal studs? Fine-thread screws are the right choice. See how to hang drywall on metal studs.
- Some people add construction adhesive. It’s optional. Read whether you need adhesive.
- If you need a vapor barrier or are working in an older house, see our guides on vapor barriers behind drywall and installing drywall in historic homes.
- Want a quieter room? See how to soundproof drywall.
Step 4: Cut around outlets, windows, and doors
Outlets and switches
- Turn off the power at the breaker.
- Measure from the edge of the sheet and from the ceiling to the box, and transfer those measurements to the sheet. Check twice.
- Cut the opening with a drywall saw or a rotary cutout tool. Leave a small gap around the box so the sheet slides on easily.
Windows and doors
- Cut an L-shaped piece so a seam doesn’t end exactly at the corner of an opening. Seams at corners tend to crack.
- Cut the sheet slightly loose, then trim for a clean fit.
Need cutting tips? See how to cut drywall like a pro, how to cut without creating excess dust, and how to repair drywall around pipes and fixtures if you cut too big.
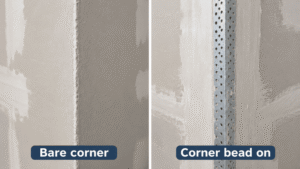
Step 5: Install corner bead
Corner bead protects and shapes outside corners, the ones that stick out into the room.
- Cut the bead to length, then hold it against the corner.
- Fasten it along both sides with screws or nails, keeping it straight. Check it with a level.
- Later, you’ll cover it with joint compound just like the flat joints.
Inside corners (where two walls meet) don’t get bead. You tape them. See our guides on drywalling corners with corner bead and how to finish inside drywall corners.
Step 6: Tape the joints
Tape covers every seam between sheets, plus inside corners. You have two main choices:
- Paper tape: strong and the pro favorite for flat seams. You first spread a thin bed of compound, press the tape in, and wipe off the excess.
- Mesh tape: self-adhesive and easier for a first-timer. Stick it directly over the seam. Use setting-type compound for the first coat. See how to mud drywall with mesh tape.
Start with the butt joints, then the long seams, then the corners. Press the tape flat with a 6-inch knife.
Don’t use masking tape (see why not). If tape bubbles later, read why drywall tape bubbles. The full step-by-step is in our complete taping guide.
Step 7: Apply mud in three coats
This is where patience pays off. Three thin coats beat one thick one every time.
| Coat | Knife | What it does |
| Coat 1 | 6 inch | Embeds the tape and fills screw dimples and corner bead edges |
| Coat 2 | 10 inch | Covers the tape and widens the joint |
| Coat 3 | 12 inch | Final feathered coat, edges thinned to nothing |
Rules that save you:
- Let each coat dry fully before the next. See how many coats of mud you need.
- Scrape off ridges and lumps between coats with your knife.
- Pick the right mud for each coat. See joint compound types for what to use when.
- Keep your tools clean and don’t over-thin the compound.
For the smoothest paint-ready walls, aim for a Level 4 finish. See our finish levels guide.
Step 8: Sand without over-sanding
Sand only when the final coat is completely dry.
- Use a pole sander or sanding sponge with fine paper, around 120 to 150 grit, and finish with 180 to 220 for a smooth surface. Our sandpaper grit guide explains how to choose, and there is a separate one for ceilings.
- Use light, even strokes. You’re smoothing the joint, not removing it.
- Stop as soon as the seam feels flat. Sanding through the paper face leaves fuzzy spots that show through paint.
- Check your work with a flashlight held flat against the wall. Ridges and low spots show up clearly.
- Wear a mask and glasses. Dust gets everywhere.
Want to skip sanding? There are ways to cut it down, but not out. See whether you can finish drywall without sanding.
Step 9: Clean the dust, prime and paint
- Clean up. Vacuum the walls and ceiling, then wipe them with a barely damp cloth. Leftover dust stops primer from sticking. See how to clean off drywall dust.
- Prime. New drywall and joint compound soak up paint differently. A coat of drywall primer evens them out and hides seams. See whether you need to prime and our painting prep guide.
- Paint. Apply two coats. A flat or matte paint hides small flaws better than a glossy one. See what color paint hides drywall imperfections.
How long does it take and what does it cost?
Time: 3 to 5 days for a typical room, as in the timeline above. The hands-on work is a couple of days spread over the drying time. For a bathroom, see how long it takes to drywall a bathroom.
Cost, for a 12 x 12 room (about 528 square feet of walls and ceiling):
| DIY | Hiring a pro | |
| Materials | Roughly $250 to $450 for sheets, screws, tape, mud and corner bead | Included |
| Labor | Your time (plus a rented lift if you need one) | About $1.50 to $3.50 per square foot installed, so roughly $800 to $1,850 |
Costs vary by region, finish level and ceiling height. As a rough guide, a room this size needs about 5 to 6 gallons of joint compound. Use our drywall calculator to size your own project.
Common beginner mistakes
- Hanging walls before the ceiling. The ceiling edges then have nothing to rest on.
- Over-driving screws. Heads that break the paper don’t hold and will pop later. See how to fix nail pops.
- Forcing sheets in too tight. This causes cracks and bulges.
- Putting seams at window and door corners. Use L-shaped pieces.
- Piling on thick mud. Thick coats crack, shrink and take forever to dry.
- Skipping the feathering. Sharp edges show through paint.
- Sanding too early or too hard. Wait until it’s fully dry, then go light.
- Skipping primer. Patches and seams flash through paint.
- Rushing. Almost every bad finish comes from not waiting for the mud to dry. If it goes wrong, see how to fix a bad mud job.
Made a hole while you worked? See how to patch a hole in drywall.
When to hire a pro
- You need a Level 5 finish, high-gloss paint or strong side lighting, where every flaw shows.
- The ceilings are very high, or the job is large (a whole floor or basement).
- There is water damage, mold or signs of moisture. See whether to repair or replace drywall.
- Your house was built before the 1980s and you’re not sure what’s in the old joint compound or texture. Get it tested before sanding or removing anything, since some older products contained asbestos.
- Wiring or plumbing is in the way and you aren’t comfortable working near it.
- You don’t have a helper or a lift for the ceiling.
FAQs
How long does it take to drywall a room?
About 3 to 5 days for a typical room, mostly because each coat of joint compound has to dry. Hanging usually takes a day, and the taping, mudding and sanding take the rest.
How many sheets of drywall do I need for a 12 x 12 room?
Roughly 17 to 19 sheets of 4 x 8 drywall for the walls and ceiling with 8-foot ceilings, once you deduct a door and window and add about 10 percent for waste. Use a drywall calculator for your own dimensions.
Do you hang the ceiling or the walls first?
The ceiling first. The wall sheets then support the ceiling edges and help prevent cracks where they meet.
How many coats of mud do you need?
Three thin coats: one to embed the tape, a second to cover it and widen the joint, and a third to feather the edges. Let each dry fully before applying the next.
Can one person drywall a room alone?
Walls are manageable with care, but ceiling sheets are heavy and awkward, so rent a drywall lift or get a helper. A 4 x 8 sheet of 1/2 inch drywall weighs about 55 pounds.
Should drywall be hung horizontally or vertically?
Horizontally for most rooms. It creates fewer seams and puts the tapered edges where they’re easiest to finish, especially on walls 8 feet or taller.
Quick recap
- Measure, order about 10 percent extra, and pick the right thickness.
- Hang the ceiling first, then the walls, with screws set just below the paper.
- Install corner bead, tape every joint, and apply three thin coats of mud.
- Sand lightly, clean the dust, prime, then paint.
- Be patient. Drying time is what makes the job take days, not hands-on work.
Got a question about your room? Leave a comment with the size and what you’re stuck on, and I’ll point you in the right direction.